

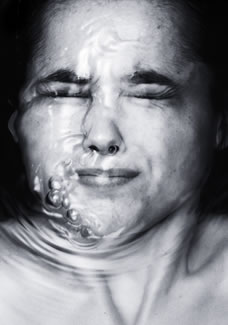
ANGUISH
In this photo, I requested the model to lie on a bathtub filled with mild water (no steam). The bottom of the tub was covered with a black cloth.
I asked her to hold her breath as much as possible. I took the shot a millisecond before she emerged to breathe .
I stood with the camera on top of her, standing with both feet on each edge of the bathtub. The scene was illuminated with a single strobe, fitted with a diffuser and bounced in the white ceiling of the bathroom.
Keeping the balance was the hardest part.
Full Frame sensor, 35 mm camera, fitted with a 50mm lens at f : 2,8 and ISO 100.
The flash was used in TTL auto..
Just did two intents and got what I wanted.
I used Photoshop and Nik Silver EFX Pro ( you can get a free copy online) to convert to Black & White and increase contrast
I wanted to capture the feeling of anguish and I think it worked.
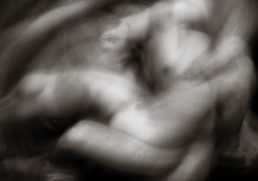
4D SEX
A couple of models simulated they were making love. I leave to your imagination if they were actually doing it or just simulating. JaJa.
They were in the studio over a small couch with a really hard mattress (to avoid tem from “sinking “, all covered with a black velvet cloth. A black background of identical material was also used.
Two 500W continuous tungsten lamps were used to illuminate the scene. One was located at aprox 3 feet from the models, to the right side of the Photographer, at 45 degrees , approximately at the same height of the models, fitted with a medium sized light box that worked as a diffuser. The other light was located approximately 3 feet on top of the models (cenital light) using a boom and fitted with a 16 inch Beauty Dish as a diffuser
Captured with a 2 second exposure, on a digital full frame camera, fitted with a 24-105mm zoom fixed at 90mm.
Models were asked to move in coordination with the exposure of 2 seconds, that was slightly slower than normal. I took several shots in different poses since results were very difficult to predict.
The image was converted to Black and White and tinted with Sepia using Nik Silver EFX Pro 2. (available for free online). I also increased contrast quite a bit, to give it a more graphic aspect.
This is a series of pictures where I played with the thin border between Art & Porno. I also did it with volumes in time, so to capture the fourth dimension in the two dimensional Photo surfaces space.

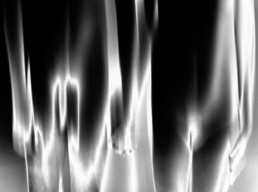
4D NUDE
This picture is actually a negative. A dark haired model, against a white background illuminated almost frontally with a portable flash and ambient light, was exposed for 2 seconds. The flash was triggered with second curtain synchronization, so its fired just before the end of the exposure.
35mm camera with B&W film. 35mm lens at f:5,6 and 100 ASA. Ambient light was good to get a blurred image during the 2 seconds exposure time. The final flash freezed the image and gave it a more defined form over the blurred image.
This is a representation of volumes in time, the fourth dimension.
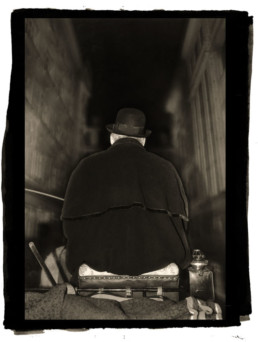
PRAGUE COACHMAN
This Photo was shot at night with 1 second exposure and f:5,6, with a 24-70mm zoom placed at 24mm. It was shot with ISO 400 color film.
Using a portable flash in automatic TTL mode, a single first curtain Synch, fill flash exposure was made. Since the ambient light was very dark and the auto mode would probably overexpose the metals and the lighter colors, the flash exposure was adjusted in -1 f stop
I framed and composed carefully. The long exposure gave the moved blurry background and the flash froze the coachman’s figure. Please remember that the dark clothes were not reflecting any or little ambient light to the negative, so the only relevant exposure captured in the image of those dark parts was the one made by the flash.
I later scanned the image and produced a 11×14 inch digital negative by printing the negative which was adjusted with a tailor made Photoshop adjustment curve that adjusted the contrast of the negative to make it compatible with the contrast of the hand laid emulsion. The printing surface was Pictorico OHP transparent film, using an Epson 4000 printer, with original inks.
The negative was placed in a contact printing frame, together with a special fine smooth watercolor paper, who had hand laid platinium/paladium emulsion on it. The irregular borders are explained because a small glass tube with a handle, was used to lay the emulsion uniformly on the paper. This negative/paper sandwich was exposed using a UV Light source and then developed according to the Platinium/Paladium process. (see Alternative Photographic Techniques book, for more details on the process, or Bostick & Sullivan for supplies)
You can get similar aesthetic results using Photoshop or with a specific plugin like Exposure X who emulates several type of films and Alternative processes. Nevertheless, the handmade craftsmanship quality, the special paper and the almost 3D quality of the image, makes the physical experience of a Platinium print quite different than a digital copy. Needs to be seen and touched to understand.
This photo appears to be shot in the middle of the 19th Century, but actually was shot in the late nineties of the 20th Century. In mid 19th Century, emulsions and flashes had very little sensibility or power respectively, so you would require hours of exposure to get any image in the dark, so at that time, it would be impossible to make this image.
Platinum printing is quite labor intensive and very expensive, so only very special images like this one deserve the effort.

MACHO III
This Photo has NO Photoshop.
In a completely black studio, with the photographer also dressed in black including black gloves and a black mask, a 4 feet by 12 feet roll of Mylar was hanged in a bar which was supported by two tripods. Mylar is a very reflective foil, which is similar to a flexible mirror. You must be very careful not to stain it with your fingers. Use gloves to handle. Behind the Mylar Foil, there was an assistant that distorted the form of the foil, using his hands and body. Be warned that there are several type of Mylars (transparent, Mirror, Golden reflective, etc). If you want to experiment, you can try several, but this picture used the mirror like one.
A 600 w/s strobe at full power, fitted with a medium sized soft box was placed high at the left of the photographer, making everything to avoid that either the equipment nor its light reflected in the Mylar. There were occasions that by moving the Mylar, some light was reflected. I used it as a variation, but this Photo had no strobe reflection.
I placed both model in front of the Mylar and I started shooting the reflections that constantly changed by the manipulation of my assistant in the Mylar.
I used a 35mm Full frame, digital camera, with a 24-70 zoom, at 100 ISO and f:16. A good depth of field was required since in many of the pictures you needed that both, the models actual bodies and the reflection be in focus.
This series of Photos were supposed to represent how Latin men(and other cultures also), sodomize and manipulate their women and many of them accept it . It doesn’t give or try to issue an opinion or judgment, It just represents a reality.
ACCELERATED COUPLE
Taken with a full frame 35mm digital camera fitted with a 85mm lens, which had a prism on front of it. It was exposed for 1 second and with a slight vertical movement during the exposure to create slight distortion and an accelerated effect. The Prism generates an aura in the higher contrast areas and adds extra distortion.
Later it was converted to Black & White and digitally solarized in Photoshop.
It was an experiment. I loved the graphic sensation of both bodies drawn by the lighter areas generated in the solarization of the auras created by the Prism.
Again I played with the slim border between Art& Porn . You can clearly see the genitals, but the couple holding their hands creates feeling. The distortion, the prism effect and the solarization in Black & White gives the image an abstract touch, but it is still clearly identifiable
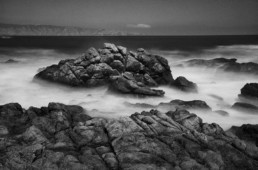
REÑACA
This image was captured with a tripod, with a 30 second exposure with, ambient light close to noon. I used a remote trigger cable to avoid any vibrations during exposure. If vibration occurs, it creates significant loss of definition.
To achieve such a large exposure in midday strong light, I used f:22, ISO 100 and screwed a 3x Neutral Density Filter in the front of the lens. This filter reduces in 10 f: stops the exposure (Each 0,3 is one f: stop).
With the filter fitted on the lens you cannot see anything, its too dark. I composed and manually focused the image before fitting the filter to the lens.
To calculate the exposure, you can use exposure tables, but I prefer to use the histograms in the camera. To do it ,you keep al variables fixed preferably in manual mode and you only change the exposure time in different trials and errors. The goal is to get all the histogram within the limits of the graph. If too much information is concentrated to the left of the histogram, then your shadows area underexposed and you need to test a longer exposure time. If too much information is concentrated to the right, you have over exposed the highlights and need to reduce de exposure time. You could also use ISO and f: stops to increase or decrease the exposure, but you must make sure the exposure time is at least 10 seconds to create the movement and blurring effect of the waves.
Full frame digital camera, fitted with a 24-70mm zoom set at 24mm.
VALPARAISO SX70
This picture is a Polaroid Time Zero SX 70 manipulation. Once you took the shot and the photo comes out of the camera and starts to develop, the emulsion of the Time Zero film could be manipulated using gentle pressure and something like a pencil, a clip, a golf tee or any other object that could gently or gradually move the liquid layers of the emulsion, that took some time to become solid (app 5 to 8 minutes). That manipulation creates this pictoric, semi impressionist effect. A little help of heat would ease the process. Unfortunately this type of film is no longer made and current Polaroid versions dont have this characteristic. (even branded as SX70)
If you crop a digitally captured image to the typical Polaroid squared proportions and then using Photoshop, apply the liquefy filter to the image. With the help of a pressure sensitive Wacon tablet/pen you can create the rippled effect of the manipulation. This has to be done gently and avoid to exaggerate the effect. You rather build the effect gradually, using a small sized diffused border brush.
To emulate the Time Zero SX70 look, you can manipulate the image in Photoshop or Lightroom or use a plugin like Exposure X that has an SX 70 preset.
The image will still look to sharp, since SX 70 definition was substantially less than current digital cameras. Use a Gaussian Blur filter and move its controls until it looks slightly blurry.